Installing and Configuring the On-Premises Gateway
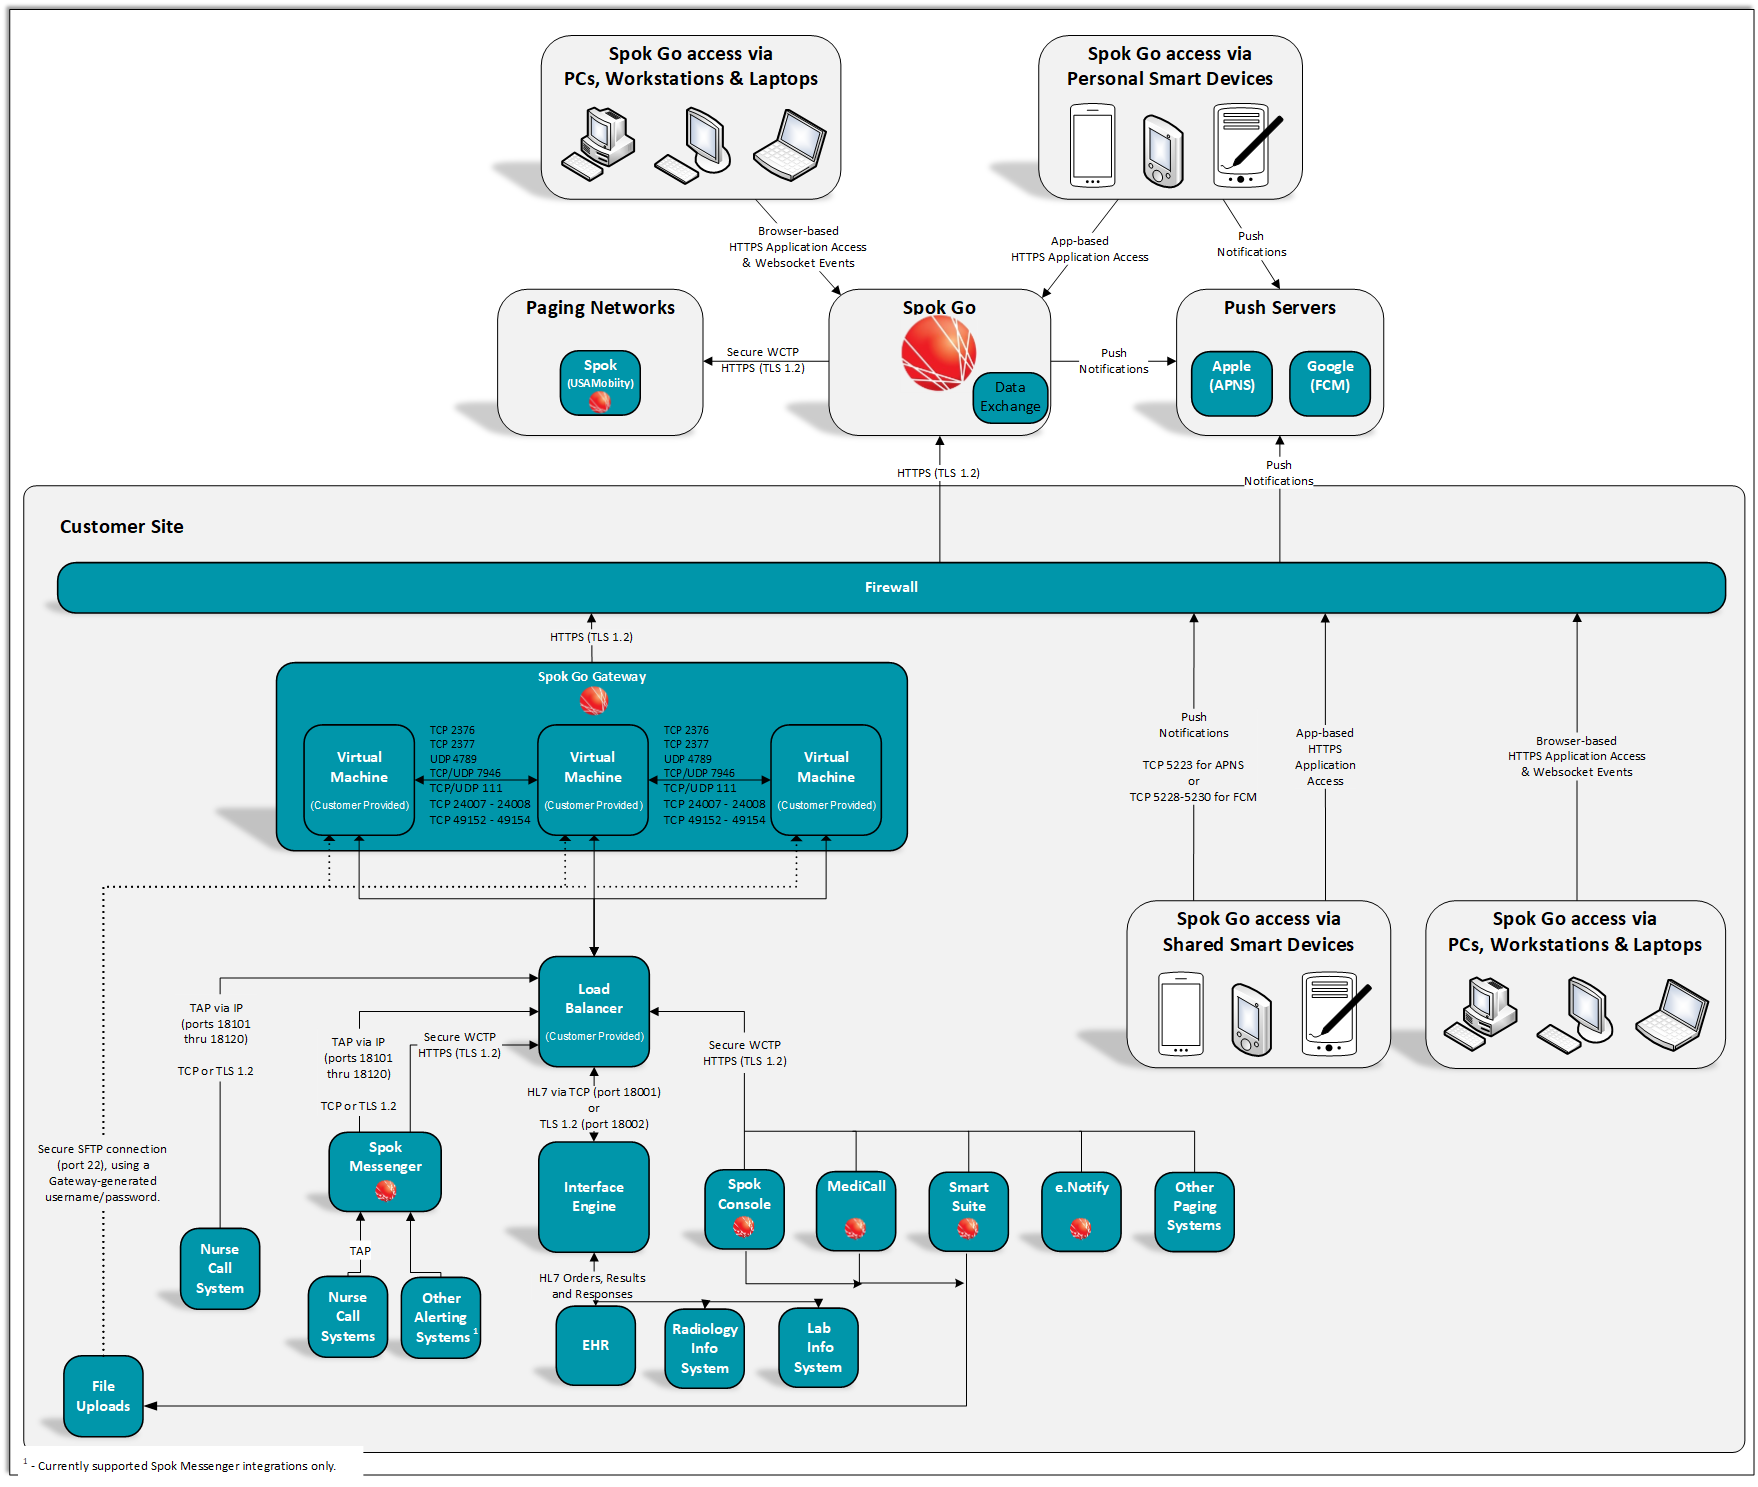
Gateway Overview
Before you Begin
Before you can install and configure the on-premises gateway, you need the following:
-
Access to VMWare at the customer site.
- A customer-provided, signed PKCS12 (PFX) X509 SSL certificate.
-
Because Spok does not embed a private key in the Gateway, this certificate and its private key must be provided by the customer and should be available at the time of the Gateway’s installation
-
The certificate should use the Fully Qualified Domain Name (FQDN) or IP address of the load balancer.
-
The corresponding root and/or public version of the certificate should also be recognized as a trusted certificate in the operating systems of any on-premises systems (ex: Smart Suite, Messenger, etc.) that are communicating with the Gateway.
-
- A load balancer to manage gateway traffic.
-
Simple round-robin load balancing between the three virtual machines for the gateway is sufficient.
-
The Fully Qualified Domain Name (FQDN) or IP address of the load balancer needs to be known at the time of Gateway’s installation and added to the customer’s DNS.
-
The on-premises gateway's virtual machines must also be added the load balancer's configuration (sometimes known as a "Resource Pool").
-
Any HTTPS traffic should pass through the load balancer, with the SSL termination occurring in the on-premises gateway. It is not necessary to load the SSL certificate on the load balancer.
-
- An active customer tenant/organization within Spok Go.
- A user account that has Spok System Administrator or Spok Support Administrator security role for the applicable customer organization.
- MediCall 11.12 or higher, Smart Suite 7.1.2 or higher, Spok Console 7.11 or higher, and/or Spok Messenger 5.16 or higher installed and configured.
-
In order to support regular maintenance and automated updates, outbound internet access from the Gateway’s VMs to specific sites is also required. See Firewall Requirements for requirements.
Spok strongly recommends using a DHCP server with the VM server to assign an IP address to each instance of the gateway and to access the internet. If a DHCP server is not available, additional configuration of the on-premises gateway is required to assign the IP addresses.
Step 1: Create the Gateway
Access Spok Go to create the gateway.
- In Spok Go, click Administration > Integrations > Gateways tab.
- Click +Gateway to add the gateway.
- In the Gateway Management page, enter the Gateway Name. This name can be edited later if needed.
- Click Save.
Delete the Gateway
In the future if you like to delete the gateway, click Delete this gateway permanently. This will permanently delete the gateway so be sure only to select this if the connector is not needed.
Step 2: Creating the Virtual Machines and Installing the Gateway
An OVA file is used to create and set up the virtual machines. The OVA file contains all of the files needed to create/deploy the virtual machine and the gateway components. Download the OVA file and import it into the virtualization program to create a virtual machine.
Downloading and Importing the OVA File
To ensure the latest version is used, download a new copy of the OVA file immediately prior to each installation.
- Go to Integrations > Gateways tab, click OVA. Choose Save File. The OVA file is downloaded.
- Sign in to the virtualization software at the customer site.
- Import the OVA file into the virtualization software. The same OVA file is used to create each machine.
- Enter a name for the gateway, such as SpokGo-gateway-node1. The virtual machine is created. It may take 15 minutes to install the gateway.
- Repeat steps 2-4 to create two more virtual machines.
- Within the virtualization software, verify each of the three machines is visible and running.
Optional Step: Updating the VM IP Addresses
The virtual machines will have DHCP enabled by default. Modifying this configuration is possible using the provided gateway command line script.
To use the script:
- Connect to the virtual machine as the gatewayadmin user.
Contact support for the initial gatewayadmin password. Once the gateway software is deployed, the password is regularly rotated for security and can be retrieved from the gateway administration page by authorized users.
The gatewayadmin user can only be used in a console session. SSH access for this user is disabled. - Use the gateway command line script to configure networking settings.
To view instructions for the script, log in as the gatewayadmin user and type: sudo gateway -help
The gateway command line script provides the ability to configure static or DHCP addressing through IPV4. IPV6 support is experimental.
Step 3: Registering the Gateway Nodes
Registering the gateway nodes within Spok Go assigns it to a specific customer. It also allows remote management, software updates, and patches.
Registration requires an activation code and ID to authenticate and identify the machines. The activation code does not need to be updated after the machines are registered. (The code does need to be used within 24 hours.) However, if you add new or additional virtual machines after the code has expired, a new code is needed to add the new machine.
Getting the Activation Code and ID
- Go to Activation Key for your gateway and click Show Key.
- Copy the Activation ID and Activation Code for use in the Registering the Gateway steps.
Registering the Gateway
- Go to the admin URL for each of the gateway nodes (example: https://0.0.0.0:8443/api/admin/help) and click Authorize.
- Sign in using the admin account. If you don't have a password, contact the Spok Development team.
- Click Authorize again to login.
- Open the Activation Put endpoint /api/admin/v1/Activation and click Try it out.
- Paste the Activation ID and Activation Code from the previous steps into the "string" fields.
- For the awsRegion, enter "us-east-1" for US customers, "ap-southeast-2" for Australia customers, or "ca-central-1" for Canadian customers into the "string" field.
- Click Execute. A success code is returned and the gateway node is registered with AWS.
If you receive the error response "TypeError: Failed to fetch", refresh the swagger page and restart at step 1 of this section.
- Repeat these steps on each virtual machine using the same activation code and ID for each virtual machine. The three virtual machines now have a secure connection to the Spok software in the cloud.
- The Gateway tab will auto-refresh every 30 seconds. You can also reload/refresh the Gateway tab in your browser so that the activated gateway nodes are displayed as connected and online.
Deploy the Gateway
- In Spok Go, click Administration > Integrations > Gateways tab.
- Click the gateway in the list and click Deploy. Note that you must have all three nodes to deploy the gateway.
- Once a deployment has been started, you can click the drop down arrow to see updates for each node during deployment. After the process has finished on each node, you can see detailed logs of the process for each node.
- Once the deployment is finished, the Update button is visible. This allows you to update to the latest version of gateway software. Check with your Spok representative to determine when updates are available.
Step 4: Enabling HTTPS
The following steps secure the communication from applications like Spok Messenger or Smart Suite to the on-premises gateway. You need to use the certificate from the customer.
This step only needs to be run on one of the Gateway VMs. The loaded certificate will auto-propagate to the other VMs after that.
- Go to the admin URL for one of the gateway nodes (example: https://0.0.0.0:8443/api/admin/help) and click Authorize.
- Sign in using the admin account. If you don't have a password, contact the Spok Development team.
- Click Authorize again to login.
-
Open the Certificate Post endpoint /api/admin/v1/Certificate and click Try it out.
-
Click Browse, select the file containing the certificate’s private key on the system and click Open.
-
Enter the password for the certificate file. Note that characters ' and $ are not accepted for the password.
-
Click Execute. The certificate is now uploaded and displays a success message. The on-premises gateway can now connect to Spok Messenger or Smart Suite. Note that the gateway will not accept requests until this step is complete.
If you receive the error response "TypeError: Failed to fetch", refresh the swagger page restart at step 1 of this section.
Optional Step: Enable SFTP
This opens an SFTP server on the gateway that can be used with connectors.
- In Spok Go, click Administration > Integration > Gateways.
- Click the Gateway > Gateway Services tab.
- Enable SFTP by sliding the toggle and click Save. The Username and Password are now available to copy for use with Data Exchange.
Gateway Instance Status
The Gateway instance status is retrieved when the Spok Go application initially loads. It is displayed in both the Spok Go gateway and details screens.
Overall Instance Status
In the Gateways screen, the overall status of the three instances is shown.
The left side shows the overall Connection Status for the instances.
|
Overall Gateway Statuses
|
Condition
|
|---|---|
|
Inactive
|
0 instances or 3 instances BUT 1 or 2 are Inactive |
|
Online
|
ALL 3 Instances are Online |
|
In Progress
|
Less than 3 instances BUT they're all Online
|
|
Connection Errors
|
1 or more instances has status ConnectionLost |
Deployment Instance Status
The right status indicator shows the overall Deployment Status for the instances. If a new gateway has not yet been deployed it will show the Not Deployed status until deployed.
| Deployment Status | Condition |
|---|---|
| Not Deployed | Deployment has not started. This indicates a new gateway has not yet been deployed. |
| In Progress | The deployment is in progress. |
| Deployed | The deployment succeeded. |
| Deploy Failed | Deployment was unsuccessful. |
Detailed Instance Status
To see a more detailed view of the status for each instance, click the gateway. The details are shown next to the IP Addresses.
Additional information regarding background updates is available for each gateway node. This information may be useful to Spok support for troubleshooting purposes.
Below is a list of the detailed instance statuses and their definitions.
| Status | Condition |
|---|---|
| Connection Lost | The node was activated but AWS is reporting back it’s unable to connect to the manager. |
| Inactive | Instance is inactive. |
| Online | Instance activation successful. |
Summary
After completing these steps, the gateway should be:
- Visible and running as three instances within the virtualization software.
- Made up of three nodes running on distinct virtual machines which are communicating with each other.
- Communicating with AWS and registered/assigned to the customer.
Next Steps
After the on-premises gateway is installed and configured, you can configure the gateway to communicate with other on-site applications, including Smart Suite and Spok Messenger. To do this, see Integrating MediCall with Spok Go, Integrating Spok Messenger with Spok Go, Integrating Spok Console with Spok Go, or Integrating Smart Suite with Spok Go for more information.