Adding and Managing Customers
You can view, add, edit, and delete customers on the Manage Customers page. To view this page, navigate to Administration > Customers > Customers from the Spok Hosted Administration interface.
A customer is anyone who has purchased Spok products. A customer will usually be a hospital or a network of hospitals.
Tenants are below customers in organizational structure, and represent a layer of data between a customer and a site.
Sites are specific geographic locations that make up a customer.
Customers cannot see their own customer names, but they can view their tenant names. The customer name is used for Spok accounting and financial purposes.
Here are two examples of how customers, tenants, and sites fit together hierarchically:
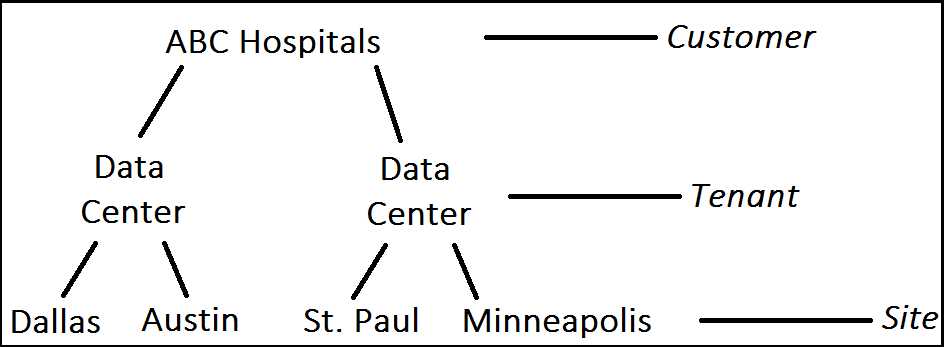
- “ABC Hospitals” purchases Spok Mobile and is added as a customer in the Manage Customers page, with the name “ABC Hospitals.” The “ABC Hospitals” customer includes an entire network of hospitals, and will be managing the data for all of its hospital locations in two separate data centers. These two data centers are considered the tenants. Each individual hospital run by ABC Hospitals is a site, and each site is associated with the appropriate tenant.
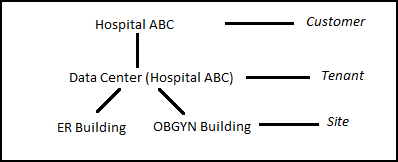
- “Hospital ABC” purchases Spok Mobile and is added as a customer in the Manage Customers page, with the name “Hospital ABC.” The “Hospital ABC” customer has only one geographic location, but this location has multiple buildings; the customer will also be managing its site data in a single data center. The data center is considered a tenant, and should have the same name as the customer. Each building at the physical “Hospital ABC” location, such as the ER Building and the OBGYN Building, is its own site, and each is associated with the “Hospital ABC” tenant.
After you have created the customer and its associated tenants and sites, you can then add license blocks on the Manage Customers page. You must add license blocks before registering any devices with Spok Mobile.
The Manage Customers Screen
The Manage Customers screen displays the customer grid, which contains the list of available customers that are currently being managed in the system. The grid can be refreshed, searched, rearranged, and reordered.
To view the customer grid, navigate to Administration > Customers > Customers from the Spok Hosted Administration interface.
For more information about the customer grid, see Getting Started.
Viewing Customers
You can view existing customers in the customer grid on the Manage Customers screen.
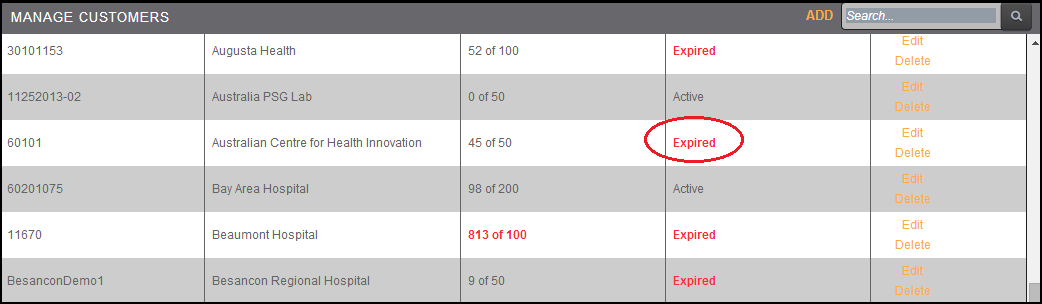
The customer grid displays the following information for each customer: Customer ID, Name, License Blocks Usage, License Blocks Status, and a Commands column.
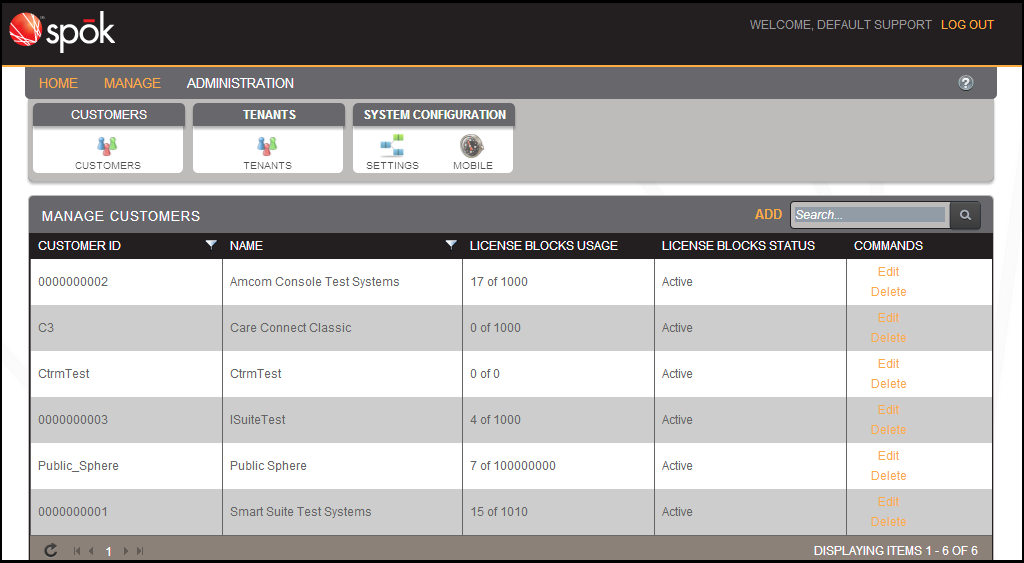
In the LICENSE BLOCKS USAGE column, values shown in red indicate that the customer has registered more Spok Mobile paging devices than they have purchased. The system allows customers to do this, and simply sends a message to Spok to alert accounting that more licenses need to be purchased. See the example below:
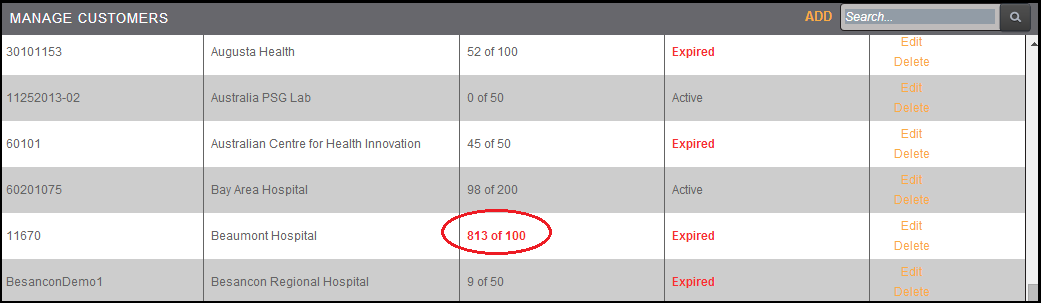
Red values in the LICENSE BLOCKS STATUS column indicate that a license block has expired. See the example below:
Adding Customers
To add a new customer, do the following:
- On the Manage Customers screen, click Add. The Create Customer screen will appear.

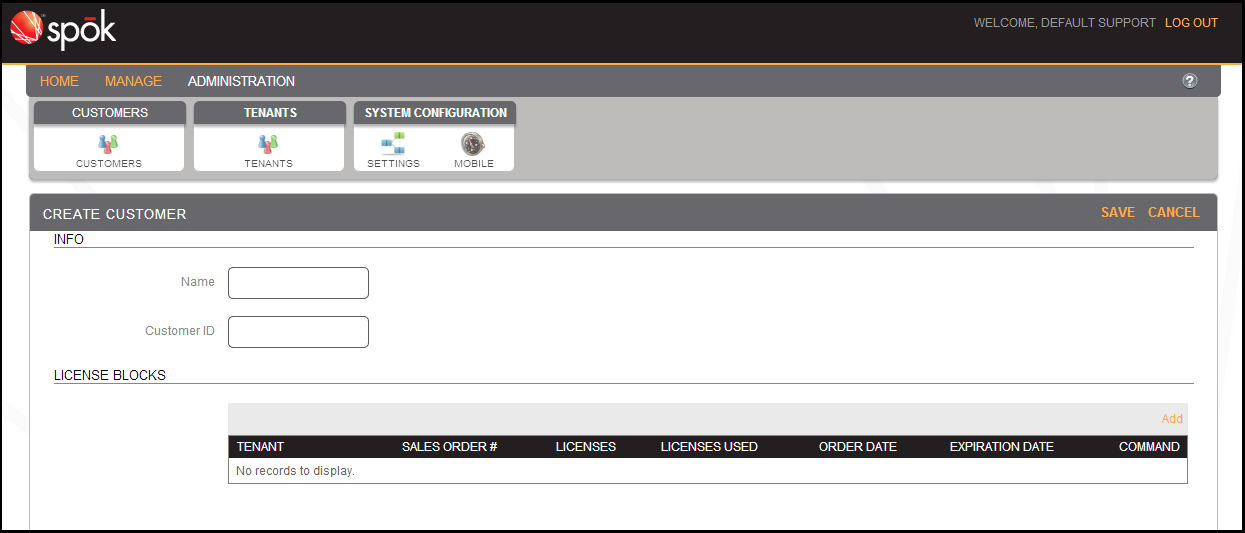
- In the Name field, enter a name for the customer. The customer name must be unique.
- In the Customer ID field, enter the customer’s ID. The customer ID must be unique.
- Add the necessary license blocks for this customer. For more information on adding license blocks, see Adding and Managing Customers.
- Click Save to add the customer.
Adding License Blocks
You can manage a customer's Spok Mobile licenses in the License Blocks table. Licenses can be purchased in blocks of any amount, depending on the needs of the customer. Customers use their licenses when they register paging devices. If a customer registers and licenses more paging devices than the number of licenses that they have purchased, the system will allow users to continue to license paging devices, and will send a message to Spok to alert accounting that more licenses need to be purchased.
More than one tenant may be associated to the same customer. For example, a group of hospitals may be registered as a single customer, but those hospitals may be using multiple data centers, or tenants, to manage their sites. The customer can purchase a block of licenses and use them across all of their tenants and sites, or the customer can purchase a separate block of licenses for each tenant.
Information about the license blocks purchased can be entered in the License Blocks section of the Create Customer page. To add license information, do the following:
- Click the Add link on the right side of the license block table. A new, editable row will appear in the table.


- In the Tenant field, select either the Global option or a site ID for an individually-licensed tenant.
- Global: All tenants and sites will share licenses from the same block of licenses purchased by the customer. Tenants that do not have individual license blocks will use the global license block.
- Tenant Name: Choosing a specific tenant indicates that each tenant has its own block of licenses. Spok Mobile paging devices registered with the tenant will use only the licenses from the block purchased for that tenant.
- In the Sales Order # field, enter the appropriate order number.
- In the Licenses field, enter the number of licenses purchased in the license block.
- The Licenses Used field will be automatically populated.
- In the Order Date field, enter the date on which the license block was purchased by clicking on the calendar icon, then selecting a date on the calendar that appears.
You cannot select a date in the past.
- In the Expiration Date field, enter the date on which the licenses expire. Click on the calendar icon, then on a date in the calendar that appears. This field defaults to one year after the Order Date.
- Click the Update link to add the license block.
- Repeat these steps for any additional license blocks.
Editing License Blocks
- Click the row that you would like to edit.
- Make any necessary changes.
- Click Update to save your changes.
Deleting License Blocks
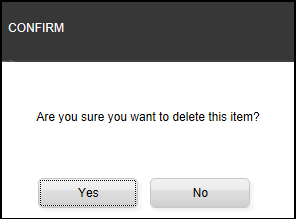
- Click the Delete link next to a license block. A confirmation dialog will appear.

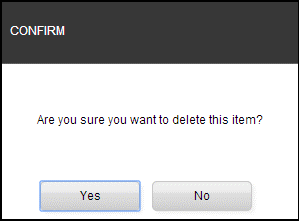
- Click the Yes button to delete the license block.
Editing Customers
To edit existing customers, do the following:
- In the Manage Customers screen, click the Edit link next to a customer. The Edit Customer screen will appear.

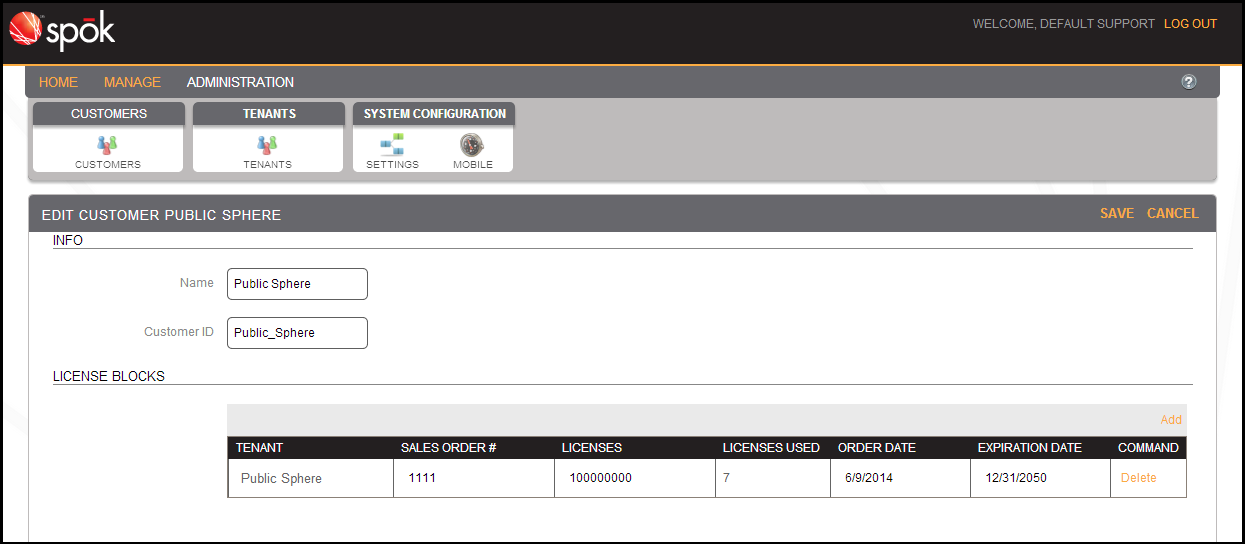
- Change the information as needed. For more information on these fields, please refer to Adding and Managing Customers.
- Click the Save link to save your changes.
Deleting Customers
To delete customers from the system, do the following:
- Click the Delete link next to a customer. A warning dialog will appear.

- Click Yes to delete the customer.