Setting up HTTPS Support
To set up HTTPS support, perform the following steps on the machine that is running Care Connect Suite.
Obtaining the Certificate
There are two ways to obtain a certificate.
- For a typical scenario, where the customer provides a certificate, see the procedure below.
- For testing and initial deployments, you may create a self-signed certificate.
Importing a Certificate
This procedure describes how to import a customer-provided certificate.
-
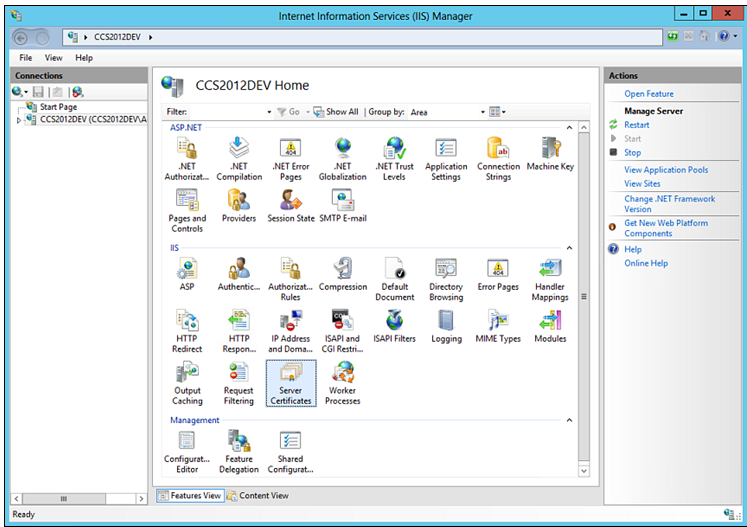
Open the Internet Information Services Manager.
-
Double-click Server Certificates. The Server Certificates panel displays.
-
Right-click in the Server Certificates panel. A drop-down list displays.
-
Click Import in the drop-down list. The Import Certificate dialog displays.

-
Click the ellipses button next to the Certificate file (.pfx) field. A dialog displays.
-
Navigate to the certificate file (for example CCS_SC_CERTIFICATE) and click it, then click Open.
-
Enter the certificate password in the Password field.
-
Leave the Select Certificate Store field set to Personal.
-
Check Allow this certificate to be exported.
-
Click OK.
-
Proceed to Enabling HTTPS Support.
Enabling HTTPS Support
-
Log into Platform Web on the CareConnect Server (http://[ServerIP]/Web) with the Support account.
-
Click ADMINISTRATION. The System Configuration tabs display.
-
Click SETTINGS. The Edit Settings page displays.

-
In the IIS CONFIGURATION section, enter the following:
-
In the Server Name field, enter the fully-qualified domain name for the server.
If the server name is entered incorrectly in this step, Care Connect will be inaccessible. Enter the name with care, and if you encounter problems, see Troubleshooting.
-
Check the Enable HTTPS checkbox.
-
Select the name of the certificate you imported or created in Obtaining the Certificate.
-
Click Save. HTTPS is now enabled.
-
Log out of Platform Web.
-
Navigating to the URLs
At this point in the configuration, HTTPS support is enabled. Users should be able to open a browser and access the web application via https://[fully-qualified domain name]/Web or https://[fully-qualified domain name]/CareConnect.
If users attempt to navigate to the web application via http://[fully-qualified domain name]/Web or http://[IP or fully-qualified domain name]/CareConnect, IIS should redirect to the HTTPS address of the web site automatically.
If you have used a self-signed certificate, certain browsers will warn the user that the website is unsafe and will attempt to prevent the user from proceeding. This is normal and you can proceed. In most browsers, future visits to the same Web application should bypass the warning message and allow you to proceed.
Troubleshooting
If Care Connect becomes unavailable after completing the HTTPS support configuration, the problem might be that the server name (fully-qualified domain name) was entered incorrectly in Enabling HTTPS Support. You can fix this in two steps:
Step 1- Removing HTTPS and the Server Name in IIS
-
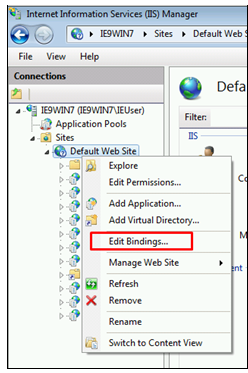
In IIS, right-click on Default Web Site.
-
Select Edit Bindings from the drop-down list.
-
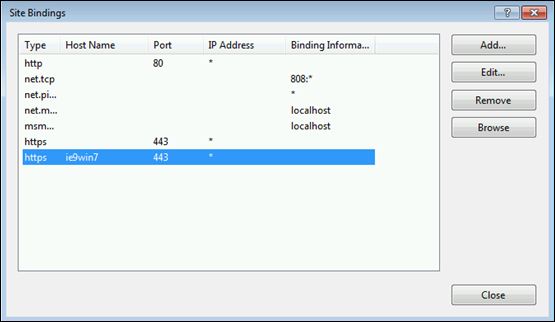
The Site Bindings dialog displays.
-
In the Site Bindings dialog, look at the list in the Type and Host Name columns. You will select the records that have https and/or the incorrect Host Name in these columns, and click Remove to remove them.
-
Once all of the incorrect items have been removed, click Close to close the dialog.
Step 2- Correcting the Server Name in the Database
-
Open the Meta database in MS SQL Server Management Studio and navigate to the Configuration table.
- Correct the following values in the configuration table:
- Revert the HTTPS settings
- Set the UseHttps value to False.
- Set all <>.Scheme row values to http.
- In all <>.ServerName rows, correct the value for the server name/fully-qualified domain name.
-
Perform an IIS reset on the Care Connect website.