Attaching to or Creating the Spok Database
The Spok database must be attached or created on the SQL Database Server. If the site is using Emergency Mode, the Spok database must also be attached or created on the Emergency Mode Backup Server.
Verifying Access to the SQL Database Server
Verify that the user account has access to be able to complete the following.
- Attach a database to the SQL Server.
- Log in to the Database server directly or through Remote Desktop Connection.
If the customer will not allow any access to the SQL Server, you may have to create the database locally and give the MDF and LDF files to the customer’s DBA to be attached.
If the customer has a DBA assigned, the customer’s DBA is required to set up database server. Please send the customer’s DBA the DBA document from the Professional Services Group: Spok Professional Services Group SQL DBA Instructions.
Creating Folders on the SQL Database Server for Database Files
Folders for the locations of the different databases must be created manually. Ensure that these folders are created with Read and Write privileges for the Users group.
IMPORTANT: This step is normally done by the customer’s DBA. This step should be done by Spok ONLY if the customer DBA does not do it.
NOTE: This process should be done ONLY if there is a dedicated SQL Database server.
If possible, do not install or restore the database files on the same drive as the operating system. The preferred location for database files is the D: drive. Logs should also go on a separate drive, preferably the E: drive.
Examples:
|
D:\SpokData\ |
SDCIntelliDesk7 databases |
|
D:\SpokData\Archive |
Archive databases |
|
D:\SpokData\Pimtest |
If PIM is being used at the site |
|
E:\SpokLog\ |
SDCintelliDesk7 database logs |
|
E:\SpokLog\Archive |
Archived database logs |
|
E:\SpokLog\Pimtest |
Log files for PIM |
Creating New Archive Databases
Create the required new archive databases.
For example:
Current and Future Archive Databases (3 years):
- SDCIntelliDESK2014
- SDCIntelliDESK2015
- SDCIntelliDESK2016
PIMTEST Database (if applicable):
- SDCIntelliDesk7_PIMTEST
- Double-click the IntelliDesk_DB_BuildX_X_XXX.exe file. This file is located in the Shared folder (for example, \\servername\SpokShared\SpokConsole\Update).
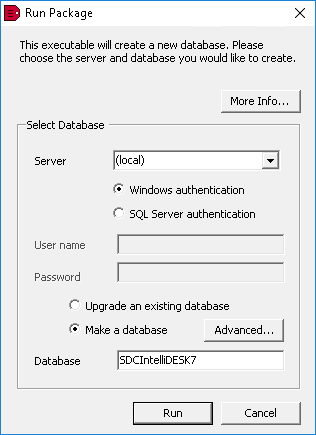
- From the Server drop-down list, select the SQL Server name, or choose (local) if running the utility on the Database Server.
- Select the appropriate authentication option.
- If the Spok user will have full access to the SQL Server, click the Windows authentication option.
- If the Spok user will not have full access to the SQL Server, click the SQL Server authentication option.
- In the User name field, enter the SQL Server user name.
- In the Password field, enter the SQL Server password.
- In the Database field, enter the database name: SDCIntelliDesk7
- Click the Advanced button.
- In the Database folder field, enter the location where the physical files should reside.
- In the Log folder field, enter the location where the physical files should reside.
- Click OK to return to the Run Package screen.
- Click the Run button to create the database. The utility will create and attach the database to the SQL Server selected, and place the physical files in the location provided. The Database now exists in SQL Server.
- Repeat the process for each new archive database you need.
Assign Database Rights for the Spok Operators Domain Group
Database rights must be assigned for the Spok Operators Domain Group. Note: If this is an upgrade, restoring the data will bring logins with relevant permissions over to new database. Any additional groups will needed to be added manually following the below process
- Navigate to SQL Server Management Studio.
- Select the Spok SQL Server option.
- Expand the Security node.
- Right-click the Logins node to display the shortcut menu.
- Select the New Login menu option. The Login-New dialog displays.
- Click the Search button next to the Login name field. The Select User or Group dialog displays.
- Click the Object Types button. The Object Types dialog displays.
- Verify that the Groups option is selected in the Object Types window.
- Click OK. You are returned to the Select User or Group dialog.
- Click the Locations button. The Locations dialog displays.
- Verify that the Entire Directory node is selected in the Location window.
- Click OK. You are returned to the Select User or Group dialog.
- In the Enter the object name to select field, type in the operator group name.
- Click the Check Names button.
- Click OK. You are returned to the Login – New dialog. Note that the log in name displayed in the Login Name field is now changed to <Domain>\<Name
- Select User Mapping page from the left pane. Note: User mapping is only used to delegate limited rights to an operator group. Any Spok accounts will have either Sysadmin privileges, selected in the “SERVER ROLES” page, or DB_Owner, selected in User Mapping.
The dialog is updated to show information about the selected page. - From the Users Mapped to this login section, select the Map column for the SDCIntelliDesk7 option.
- From the Database role membership for section, select the following options: DB_Datareader and DB_Datawriter
- Leave the Public option selected.
- Click OK.
- Click OK once more to create the user in SQL Server.