Settings
This page describes how to access and configure the settings for the Spok Mobile app. The sections below cover the settings in order from top to bottom, and explain what each setting does, and how to configure it.
Some of these settings may not be editable on your device. If a settings option cannot be edited, then this means that the site administrator controls the settings option from the administrator portal. In this situation, the setting is grayed out and cannot be configured within the application.
Accessing the Settings Screen
To access the Settings screen:
- In the Spok Mobile application, click the drawer button. The drawer displays:

- Click the Settings button. The Settings screen displays:

Tone Settings
Tone Settings Overview
Spok Mobile messages are classified into three categories by the sender of the message—high priority, medium priority, or low priority. The High Priority Tone, Medium Priority Tone, and Low Priority Tone settings allow you to configure the tone, interval, and number of repeats for each message priority classification.
The tone, interval, and number of repeats dictate the sound that plays, how frequently the sound plays, and how many times the sound is repeated when an incoming Spok Mobile message is received on your device.
When a message is received in the Spok Mobile application, different tones play based on where you are in the application.
- If you are outside of the Spok Mobile application, the configured tone will play.
- If you are in the Spok Mobile application but not in the chat where the new message was received, the configured tone will play.
- If you are in the Spok Mobile application and in the chat screen where the new message was received, no tone will play.
When an Android device is muted but the sound of the priority is not set to “Off” in the Spok Mobile application, the application still sounds a tone when a message is received. To disable the tone from beeping, you must configure the Volume setting to “Off” in the Spok Mobile application. Please note that not all Android operating systems and devices support this functionality.
Additionally, when the Android operating system settings as well as the Spok Mobile settings are set to refrain from vibrating when a message is received, the device continues to vibrate.
Configuring Tone and Vibrate Options
To configure the tones in the Spok Mobile application, perform the following steps:
- Open the Settings screen.
- Navigate to the tone settings:

- Enable the Use Device Settings option if you would like the Spok Mobile application to use the ringtone that you have configured on your Android device’s operating system. In most cases, this is set in the Settings application on your Android device. When the option is enabled, a check mark displays in the box next to the option and the Spok Mobile application plays your device's ringtone when a Spok Mobile message is received.
NOTE: The device's ringtone is what plays when a phone call is received, not to be confused with other notification tones configured in the device's settings. - Enable the Vibrate only option if you would like your device to refrain from playing a tone and only vibrate when an incoming Spok Mobile message is received.
- If you do not want the Spok Mobile application to use your device’s configured ringtone, you can choose to use the application’s tones. Based on the level of priority for which you are configuring the alarm options, choose one of the options listed below. The High Priority Tone, Medium Priority Tone, or Low Priority Tone screen displays.

- Configure the following information:
Vibrate Only
Enable the Vibrate Only option if the device should only vibrate (and not play a tone) when a new message is received.
The Vibrate Only option behaves according to these rules:
- When this option is enabled and the application is in the background/foreground, sounds (alerts and chat messages) are not played.
- When this option is disabled and the application is in the background/foreground, tones play a sound according to their settings.
Tone
In the Tone field, choose the tone option that you would like to play when a Spok Mobile message is received.
Volume
In the Volume field, choose one of the following options:
- High: Choose the High alarm volume option if you would like the device to sound the highest volume sound when a Spok Mobile message is received.
- Medium: Choose the Medium alarm volume option if you would like the device to sound at a level that is lower than the “High” volume, but louder than the “Low” volume when a Spok Mobile message is received.
- Low: Choose the Low alarm volume option if you would like the device to sound at a level that is lower than the “High” and “Medium” volumes when a Spok Mobile message is received.
- Off: Choose the Off alarm volume option if you would not like the device to sound when a Spok Mobile message is received. Please note that when this option is chosen, your device does not alert you when a Spok Mobile message is received. Choosing this option can lead to missing Spok Mobile notifications.
Interval
In the Interval field, choose the number of seconds that you would like between rings. For example, if you choose the 10 seconds option in this field, the device sounds a notification, waits 10 seconds, and then sounds the next notification.
Vibrate with Tone
Enable the Vibrate with Tone option if you would like the device to vibrate when a Spok Mobile message is received on your device. When this option is enabled, a check mark displays in the box next to the option and the configured tone plays and the device vibrates when a Spok Mobile message is received.
Number of Repeats
In the Number of Repeats field, choose the desired number of times that you would like the tone to sound. For example, if the 9 option is chosen, the device repeats the tone nine times after a Spok Mobile message is received.
The changes are automatically saved.
Silencing Tones
Spok Mobile tones can be silenced by using the device’s buttons as well as by configuring the tone settings in the Spok Mobile application. It is important to note that silencing the Spok Mobile tones can lead to missed messages due to the lack of audio notifications when messages are received.
Silencing Tones with the Device’s Buttons
Spok Mobile tones can be silenced by using your device’s hard buttons. For example, if a Spok Mobile message is received and the tone sounds, the tone can be silence by using the buttons on the side of your Android device. For more detailed information on how to control the volume and silencing function on your device, refer to the technical documentation for your device.
Silencing Tones with the Application’s Tone Settings
- Access the Settings screen.
- Based on the level of priority for which you are configuring the alarm options, choose one of the following options: High Priority Tone, Medium Priority Tone, or Low Priority Tone.
- In the Volume field, choose the Off option. Choosing the Off option prevents the device from sounding an alarm when a Spok Mobile message is received. The change is automatically saved.

Do Not Disturb
The Spok Mobile application should be added to the Do Not Disturb Override list in the Android device. When this is added, audible alerts are received, even when Do Not Disturb is in use.
If you choose to leave Spok Mobile in Do Not Disturb mode, you risk alarm tones not playing. This configuration is not recommended.
To receive audible alerts for Spok Mobile messages, you must override the Do Not Disturb settings using the steps below.
Overriding Do Not Disturb
- Open the Settings screen.
- Tap the Do Not Disturb Configuration option. A message indicates that the app is in Do Not Disturb mode.
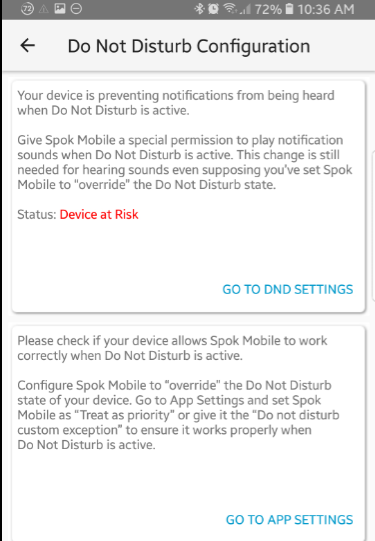
- Tap Go to DND Settings. A list of applications are displayed along with the option to override Do Not Disturb.
This shows that the Spok Mobile application is currently not set to override Do Not Disturb:

- For the Spok Mobile application, switch the toggle to on. In the confirmation screen, press Allow.
- Tap the back arrow and tap Go to App Settings to change the Spok Mobile app settings. Switch the Do not disturb exception to on.
- The configuration now indicates that Spok Mobile has the ability to override the Do Not Disturb option:
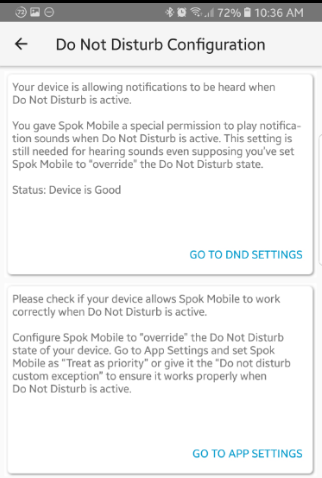
Additionally, the Do Not Disturb Configuration option should now display in normal text color in the Spok Mobile application.
Visual Display Settings
The Visual Display Settings have been deprecated for the 4.8 release of the Spok Mobile application, and will be grayed out in the application.

Messaging Settings
The messaging settings allow you to configure settings that directly relate to messaging, such as whether to automatically load message attachments, or whether to display visual notifications when users read or receive your messages.
Message Templates
Spok Mobile message templates are not currently supported in the 4.8 release, but will be reintroduced to the application in a later version.
Auto Load Attachments
Enable the Auto Load Attachments option if you would like Spok Mobile to automatically display pictures and videos that are included in received messages.
When this setting is enabled, only pictures and videos up to 2 MB in size will be automatically loaded and displayed.
Enabling this feature can affect your cellular data usage.
Message Delivery Notifications
The Message Delivery Notification settings determine which message delivery status notifications will display beneath chat messages. The following image shows a sample chat message with the Read and Delivered message delivery notifications enabled:

To configure message delivery notifications:
- Open the Settings screen.
- Select the checkbox next to the type of message delivery notification you wish to enable. The available options are:
|
Message Delivery Notification Type |
Description |
| Delivered | Displays when a message that you sent has been delivered to the recipient(s) in the chat. |
|
Read |
Displays when the recipient(s) read the message. NOTE: In a group chat, this will appear with a number indicating how many recipients have read the message (e.g., "Read 2" if two recipients have read it). |
| Failed | Displays when a message that you sent has encountered an error, and was not delivered to the recipient(s). |
Android Notifications
Enable the Android Notifications option if you would like to use an Android wearable device (Example: Android watch) with the Spok Mobile application.
Message Storage Settings
The message storage settings allow you to configure both the maximum age of messages in your inbox, and the maximum number of chats that will be retained. Note that message storage settings only apply to chats and messages in your inbox, not to the same chats and messages in another user's inbox.
Configure these settings carefully. Depending on the values that you set, you may lose messages while your device is offline. If your device goes offline for longer than the configured Maximum Message Age, messages may expire before your device comes back online. If you reach the maximum number of stored messages while your device is offline, any messages over the maximum number will be automatically deleted and you will not see them when your device comes back online.
Maximum Message Age
To configure how long messages are stored in your inbox:
- Open the Settings screen.
- Click the Max Message Age dropdown, then select the maximum number of days that you would like to save messages in your inbox. For example, if you would like to save messages for five days, choose the 5 Days option:

Maximum Messages Stored
To configure how many chats are stored in your inbox:
- Open the Settings screen.
- Click the Max Messages Stored dropdown, then choose the maximum number of chats that you would like to store in your inbox. For example, if you would like the application to save up to 500 chats total, then choose the 500 option.

When the total number of chats in your inbox exceeds the maximum number of chats to retain, then the chat at the bottom of your inbox will be deleted first (i.e., the chat that has gone the longest time without a new message).
Application Status Settings
The application status section in the Spok Mobile settings allows you to view various status information, such as network server status and application log files.
For more information, see the Viewing Application Status Information page.
Security Settings
The Security section of the Settings screen allows you to set up, update, and delete access codes. It also provides access to the Enable Screenshot Restriction setting.
Access Codes
Access codes in the Spok Mobile application act as passwords that must be entered when the application is opened. This code can be a mix of numbers and letters that you would like to use to protect the application. Additionally, if your device supports the functionality, you can scan your fingerprint to access the application. In this case, the fingerprint scan acts as the code and the application opens after the fingerprint is scanned.
When an access code is set, you must enter it before the application will open. More specifically, the code must be entered in the following situations:
- You open the application
- You receive a message and the application is not open on the device
- Your device enters a locked state and you re-open the application
- Your application is put in the background and is re-opened
Some sites may require that the devices belonging to their site use access codes. In this case, you are asked to set an access code on the device immediately after the device is registered. When an access code is set by a site administrator, the code can be changed by the user but the code cannot be deleted.
Further, site administrators can also require that a minimum number of characters are set for access codes. For example, a site administrator can require that all of the clients that are registered to the site being configured have access codes with a minimum length of ten characters. If this is the case, you are asked to set an access code with at least ten characters on your device.
It is important to note that access codes can take several seconds to save after being set up on Android devices.
Entering Access Codes
When an access code is set on the device, you must enter the access code before the Spok Mobile application opens.
Entering Numeric and Alphanumeric Access Codes
Numeric and alphanumeric codes can be required on your device before the application opens. To enter an alphanumeric or numeric code to open the application, perform the following steps.
- Open the Spok Mobile application. If you do not have a fingerprint scan set up, the Access Code screen displays.

- In the Enter Access Code field, enter the access code that is set on your device.
- Tap the OK button. The Spok Mobile home screen displays.
Entering Fingerprint Access Codes
A fingerprint scan can be required on your device before the application opens. Before this feature can work, you must have the Fingerprint feature configured with your fingerprint on your Samsung Android device because the Spok Mobile application uses that fingerprint in the application. For detailed information on how to configure the Fingerprint feature on Android devices, please refer to Android’s technical documentation. Then the Enable Fingerprint setting must be enabled and set up in the Spok Mobile application.
Using fingerprint access codes with Spok Mobile is only supported on Samsung Android devices at this time.
To scan your fingerprint to open the application, perform the following steps:
- Open the Spok Mobile application. When a fingerprint access code is set and the Spok Mobile application is opened, the Swipe your finger over the home key dialog displays.

- Place your finger on your device’s fingerprint scanner. The device scans your fingerprint and the application opens.
If issues with the fingerprint scanner are experienced, enter the backup alphanumeric or numeric access code that is set.
Setting Access Codes
Access codes can be set on the Spok Mobile application. When an access code is set, the alphanumeric or numeric value or the fingerprint scan must be entered before the Spok Mobile application can be accessed.
Setting Numeric and Alphanumeric Access Codes
To set an access code in the Spok Mobile application, perform these steps:
- Open the Settings screen.
- In the Settings screen, select the Access Code setting. The Access Code screen displays:

- In the New Access Code field, enter a code that you would like to enter to access the Spok Mobile application.
- In the Confirm Access Code field, re-enter the code that you entered in the New Access Code field. Before this information can be saved, the New Access Code and Confirm Access Code fields must match.
- When the desired information is entered, tap the Save button.
Setting Fingerprint Access Codes
The Enable Fingerprint feature can be set up to act as a fingerprint access code that must be entered before the Spok Mobile application opens. It is important to note that before this feature can be set up, you must have the Fingerprint feature configured with your fingerprint on your Android device because the Spok Mobile application uses that fingerprint in the application. For detailed information on how to configure the Fingerprint feature on Android devices, please refer to Android’s technical documentation.
To set up a fingerprint access code in the Spok Mobile application, perform the following steps:
- Open the Settings screen.
- Set a numeric or alphanumeric access code, as described in the procedures above.
- Once the access code has been set, return to the Settings screen. The Enable Fingerprint field is now unlocked and can be configured.
- Enable the Enable Fingerprint option. The application now requires the fingerprint that is configured in Android’s Fingerprint feature on your device to be scanned before the Spok Mobile application can open.
The backup numeric or alphanumeric access code that is configured can also be entered if issues are experienced with the fingerprint scan.
Updating Access Codes
Existing access codes that are configured in the Spok Mobile application can be updated.
Updating a Numeric or Alphanumeric Access Code
To update an existing numeric or alphanumeric access code in the Spok Mobile application, perform these steps:
- Open the Settings screen.
- In the Settings screen, choose the Access Code option. The Access Code screen displays.

- In the Old Access Code field, enter the existing access code that you have set on your device.
- In the New Access Code field, enter the new access code that you would like to set on your device. After this code is saved, you will be required to enter this code every time you access the Spok Mobile application.
- In the Confirm Access Code field, re-enter the code that you entered in the New Access Code field. Before the new code can be saved, the information that is entered in the New Access Code and Confirm Access Code fields must match.
- After the desired information is entered, tap the Save button. The information is saved.
Updating a Fingerprint Access Code
The Spok Mobile application uses the Fingerprint Android setting to identify the fingerprint that must be scanned before the Spok Mobile application can open. Because of this, to update the fingerprint scan that the Spok Mobile application uses as an access code, the fingerprint that is stored in the Android settings Fingerprint feature must be updated. For detailed information on how to configure the Android Fingerprint feature in the Settings screen, please refer to Android’s technical documentation.
Using fingerprint access codes with Spok Mobile is only supported on Samsung Android devices at this time.
Deleting Access Codes
Existing access codes that are configured in the Spok Mobile application can be deleted or disabled.
Deleting Alphanumeric and Numeric Access Codes
To disable the access code feature on your device, perform these steps:
- Open the Settings screen.
- In the Settings screen, choose the Access Code option. The Access Code screen displays.
- In the Old Access Code field, enter the existing access code that you have set on your device.
- In the New Access Code field, do not enter information.
- In the Confirm Access Code field, do not enter information.

- Tap the Save button. The information is saved and an access code no longer needs to be entered to access the Spok Mobile application on your device.
Disabling Fingerprint Access Codes
Existing fingerprint access codes can be disabled.
- Open the Settings screen.
- Disable the Enable Fingerprint option. The option becomes disabled and a fingerprint access code is no longer required to open the application.
Managing the Access Code Delay
The Access Code Delay setting in the Spok Mobile application allows you to extend the amount of time that the application waits before locking the application and requiring an access code to re-open the application. More specifically, you can set the application to only lock and require an access code entry to re-enter the application after 10 minutes, 20 minutes, or 30 minutes.
For example, if your device has an access code set and you set the Access Code Delay feature to 10 minutes, you can exit the Spok Mobile application and perform activities outside of the application on your smartphone for up to 10 minutes before the application requires you to enter an access code to re-gain access to the application. If you re-open the application within 10 minutes, you would not have to enter an access code for the application to open.
To manage the Access Code Delay:
- Open the Settings screen.
- In the Settings screen, choose the Access Code Delay option. Please note that you can only click on the Access Code Delay option if an access code is set on your device. The Access Code Delay dialog displays.

- Choose one of the following options:
|
None |
Choose the None option if you would like the application to automatically lock and require an access code entry to re-open the application immediately after the application is closed or exited. |
|
10 minutes |
Choose the 10 minutes option if you would like the application to wait 10 minutes before locking and requiring an access code entry to re-open the application after the application is closed or exited. |
|
20 minutes |
Choose the 20 minutes option if you would like the application to wait 20 minutes before locking and requiring an access code entry to re-open the application after the application is closed or exited. |
|
30 minutes |
Choose the 30 minutes option if you would like the application to wait 30 minutes before locking and requiring an access code entry to re-open the application after the application is closed or exited. |
The change is automatically saved.
Enable Screenshot Restriction
The Enable Screenshot Restriction setting prevents your Android device from taking screenshots of the Spok Mobile app, providing enhanced confidentiality and security for the application. This setting applies when the app is in the foreground, or the background, or in task mode.
To enable this setting:
- Open the Settings screen.
- Navigate to the Security Settings section.
- Select Enable screenshot restriction.
About
The About section contains a single option, Info. Click it to see information about the Spok Mobile application, including copyright information and version number.
