Messaging
For example, if you would like to quickly send a picture of a patient’s medical record from your mobile device, sending a picture of that information through the Spok Mobile application ensures that the information remains private and is sent securely, keeping confidential information private.
Sending videos and photos is helpful if you want to communicate information like test results or x-rays. Files with the following format can be sent and received in Spok Mobile messages:
- .jpeg, .jpg
- .png
- .gif
- .mp4
- .txt
- .heic (the Spok Mobile app converts these files to .jpeg)
Note: You may be prompted to confirm Spok Mobile has permission to access the gallery or camera when attaching a photo or video.
The Spok Mobile application limits the file size that can be included per Spok Mobile message. Per message, the maximum file size that can be included in each composed message or message response is 1 GB.
In addition, some cellular providers limit the size of messages, which can restrict the number and size of the pictures that are included in Spok Mobile messages. For more detailed information on the size limits that your provider has, please contact your cellular provider for additional clarification information.
Please note that if your cellular device does not have a camera function that supports the capturing of pictures, this option is disabled in your Spok Mobile application. In addition, site administrators can remove the ability for users to send picture and video attachments. If this option is disabled on your device, the Attach button does not display in your Spok Mobile application.
As an added security feature, the Spok Mobile application prevents you from copying received pictures and setting received pictures as the default image for a device background or device lock screen. This ensures that confidential, private pictures cannot be shared or viewed outside of the secure Spok Mobile application.
Alert and Message Notifications
When the Spok Mobile app is successfully set up on your device, it will let you know when you have an incoming alert or message. When you are not in the app, Spok Mobile message and alert notifications display in banners on the lock screen and home screen, and also display in the Navigation Center. Once a message or alert is opened, you can view the message text, the message status, the time the message was sent, and other information in the Message screen.
A Spok Mobile message can display links to telephone numbers and URLs. If a link displays in an incoming message, you can click on these links to initiate a phone call or to open the URL in a web browser.
When Spok Mobile alerts and messages are sent to a device that is turned off, they are received on the device the next time the device is turned on, if the device is turned on within 5 minutes of the message being received. Additionally, when devices are in sleep mode, messages are received. This means that when devices are not currently being used but have an internet connection, Spok Mobile messages can still be received on devices.
Customize Your iOS Notification Settings
Your iOS device will allow you to customize the notifications you see from individual apps, including whether or not you see notifications on the lock screen. Visit the Settings > Notifications menu, and tap Spok Mobile in the Notification Style list to view the available options. You can also personalize the order in which your notifications display using your iOS device's Settings > Notifications menu. It is recommended that you prioritize your Spok Mobile notifications by setting your device's Sort Order to Manual and dragging Spok Mobile to the top of the list. This will help ensure you see the critical Spok Mobile messages you need. See Apple's help documentation for detailed instructions for your device.
Viewing Your Chat Messages Inbox
When a chat style message is sent to a group of people, all recipients receive the original message and the message sender receives all subsequent messages that are sent within the combined chat message from all of the individuals in the group. When chat messages are received, the message receiver(s) are not required to respond to the incoming message. Instead, the incoming messages display as standard, chat-style messages where all messages are included in one message thread.
If a chat message is received on your device, the Messages inbox displays or the incoming chat message displays in the chat screen. If you are outside of the application or are on a screen in the application (not in a chat screen), the new chat message displays in the Messages inbox. The new, unread message displays bolded to indicate that the message has not been read.
In the Messages inbox, individual and group messages are displayed slightly differently. Message threads with another individual display the personalized picture or individual icon, the person's name, the first part of the text of their message, and the message time. Group message threads display the group icon, the name of the group, the first part of the text of the last message and the name of the group member who sent it, and the message time.
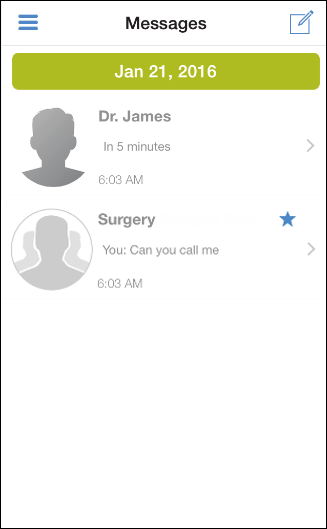
To view a message thread, simply tap the message in the Messages inbox. Within a message thread, you can easily view the details of each message's status. Each message can be expanded or collapsed to show more or less information.
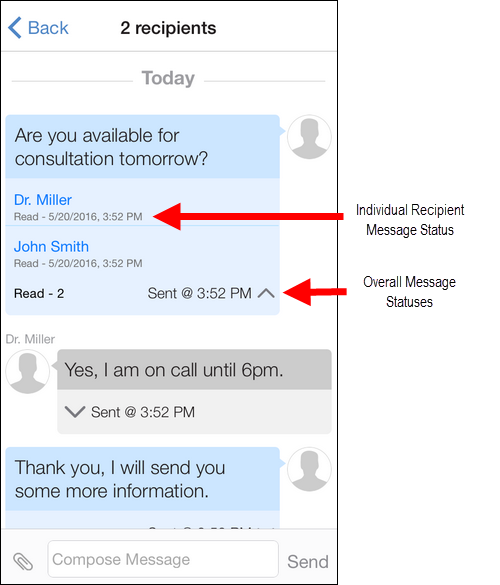
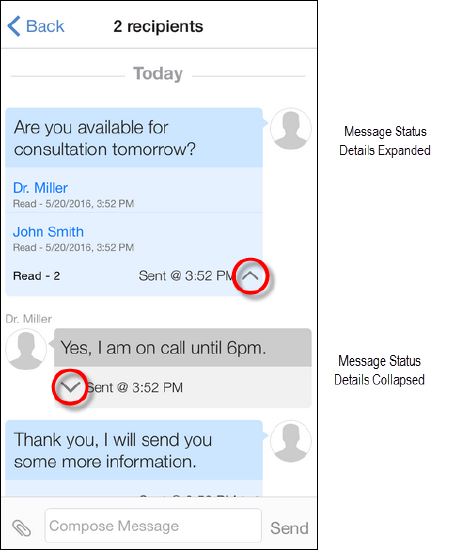
Message Status Definitions
Individual Recipient Message StatusesIndividual message statuses provide the sender a detailed view of the status for a message sent to an individual. |
|
|
Status |
What it Means |
|
Read - mm/dd/yyyy, hh:mm AM/PM |
The message recipient read or accepted the message. |
|
Declined - mm/dd/yyyy, hh:mm AM/PM |
The message recipient declined the message. |
|
Delivered - mm/dd/yyyy, hh:mm AM/PM |
The message is on the recipient's device; the recipient has not yet read or accepted the message. |
|
Failed - mm/dd/yyyy, hh:mm AM/PM |
The message did not successfully reach the system. |
|
Sending |
The message is in the process of being sent to the system. |
|
Sent |
The message has been successfully received by the system but not by the recipient's device. |
Summary Message StatusesSummary message statuses provide the sender a convenient view of the status for a message sent to multiple recipients. |
|
|
Status |
What it Means |
|
Read - # |
The number of message recipients who have read or accepted the sender's message. |
|
Declined - # |
The number of message recipients who have declined the sender's message. |
|
Failed |
The message did not successfully reach the system. |
|
Sent @ hh:mm |
The time the sender sent the message. The Sent summary is displayed to the sender and recipients of the message. |
Replying to Alert Messages
When a Spok Mobile alert-style message is received, you have the option to choose from the following response options:
- Accept: Choosing the Accept option indicates that you received the message and you accept the message’s content.
- Decline: Choosing the Decline option indicates that you received the message, but you do not accept the message’s content.
- Reply: Choosing the Reply option indicates that you received the message and allows you to respond or reply to the message’s content.
- Call Back: When a phone number is included in the text of an incoming Spok Mobile message, you can click Call Back to initiate a phone call using your device’s phone feature or using a VoIP connection that is configured in the Call System feature in the Settings screen.
Accepting Messages
-
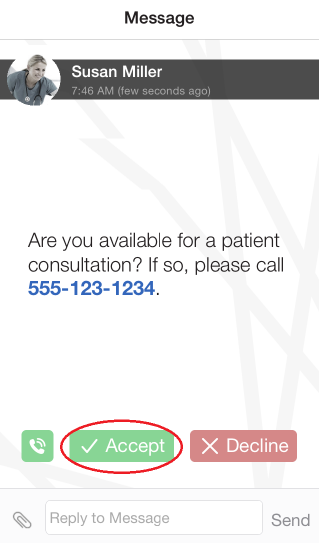
An incoming Spok Mobile alert message displays on your device in the Message screen.
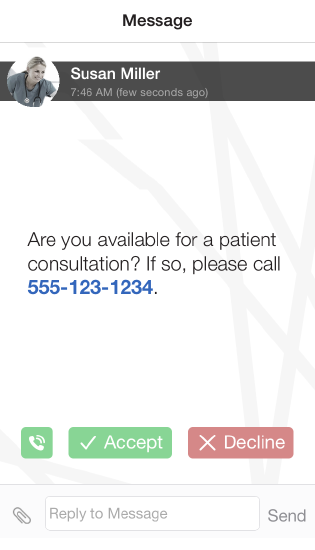
- To accept the message’s content and send an “Accept” response to the message sender, click Accept . The message sender is notified that you accepted the message.
Declining Messages
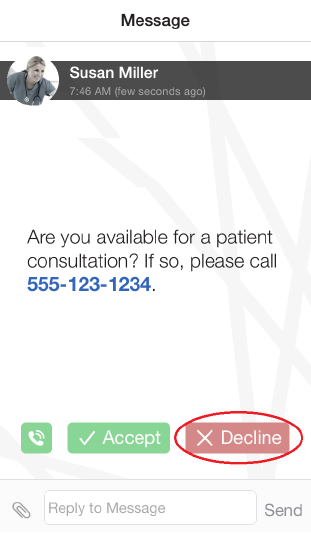
- An incoming Spok Mobile message displays on your device in the Message screen.

-
To decline the message’s content and send a “Decline” response to the message sender, click Decline . The message sender is notified that you declined the message.
Sending a Reply
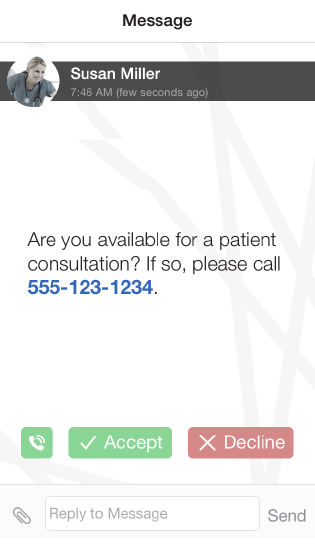
- An incoming Spok Mobile message displays on your device in the Message screen.
-
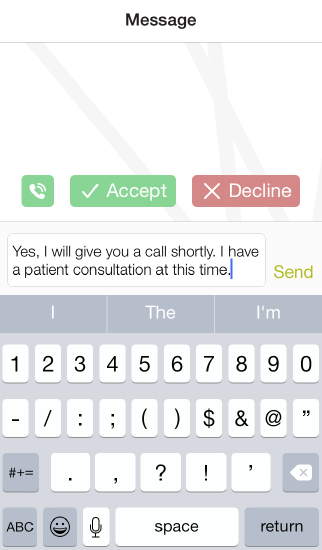
In the Reply to Message field, enter any reply text that you would like to send in response to the message.
- Attach any desired media. For detailed information on how to attach media, please refer to the following:
- Attaching Existing Videos
- Attaching New Videos
- Attaching Existing Pictures
- Attaching New Pictures
- Attaching Media from Box
- After the desired text and media are entered, click Send . The reply message is sent.
Knowing When Your Reply Recipient is Unavailable
If the contact you are trying to reply to is unavailable, a Contact is not available message appears at the bottom of the alert or messaging screen when you first open the message. If you tap the send icon to attempt to send a message to an unavailable recipient, the message reappears and prevents you from sending the message.
Alert Recipient is Unavailable
If you are trying to reply to an alert from someone who is unavailable, the Contact is not available for messaging message that displays provides you with the option to copy any text you may have already entered in your reply. If there is someone else you would like to send your reply to, tap Copy Text. That text will be ready for you to paste into a new message to your alternate contact.
Alert screen displaying the Contact not available for messaging message:
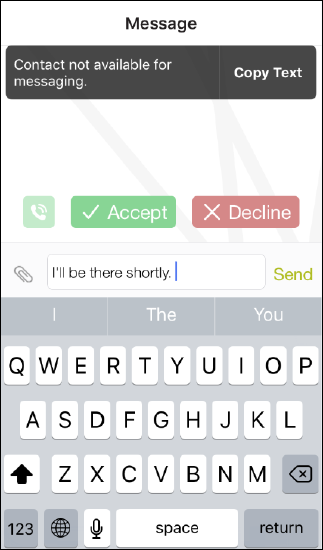
To paste your text into a new message, long press in the new message's Compose Message field, and select Paste from the options that appear.
Message Recipient is Unavailable
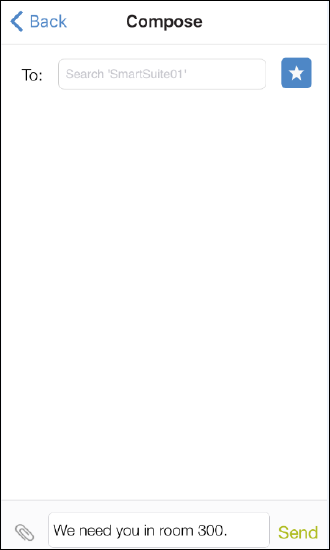
If you are trying to reply to a message from someone who is unavailable, the Contact not available message that displays provides you with the option to send your reply to someone else. To send your message to someone else, tap Send to Other and a new Compose screen will display to allow you to choose an alternate contact. Any text you have written will appear in the new message's Compose Message field, and you can add or edit your message text as needed.
Messaging screen displaying the Contact not available message:
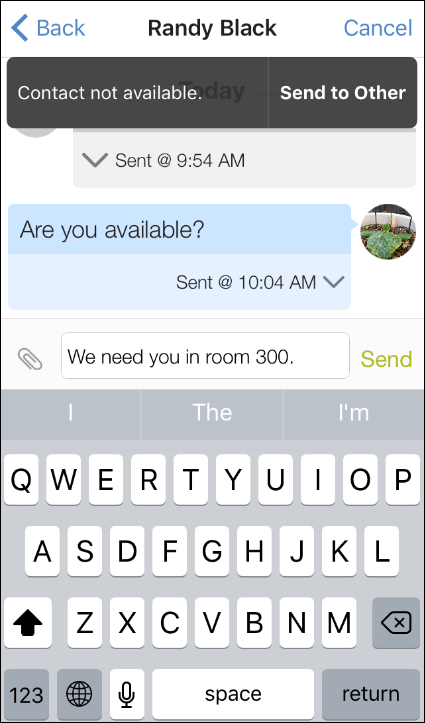
A Compose screen displays after user has tapped Send to Other:
Performing a Call Back
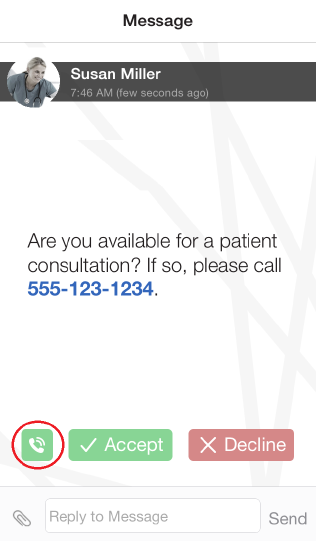
When a Spok Mobile message is received that includes a phone number, a Call Back button displays that allows you to initiate a phone call to the phone number that is included in the message as well as send an acknowledgement response to the message sender. If more than one call back number is included in the message, you are asked which number you would like to call before a phone call is placed.
Before the Call Back button will display, your device must have either a telephone function or a VoIP connection must be configured in the Call System feature in the Settings screen. For detailed information on how to configure a call system for the Spok Mobile application to use to initiate phone call, please refer to Call System.
The phone number that displays in the message also displays as a clickable value, allowing you to click the phone number to initiate a phone call. Please note that the Spok Mobile application also supports additional characters (“;” and “,”) that are used to signify a “wait,” “pause,” or an extension within the phone number. For more detailed information on the format patterns that the Spok Mobile application supports, please refer to the Troubleshooting_Guide_Spok_Mobile document.
The Spok Mobile Call Back feature supports calling international numbers.
- An incoming Spok Mobile message displays on your device in the Message screen.

-
Click the Call Back button. Your device’s phone feature is activated and a telephone call is placed to the phone number that was included in the Spok Mobile message.
Sending Messages
Spok Mobile messages can be sent from your device to other Spok Mobile users. To send messages, you must include at least one message recipient which can be added by searching for the recipient’s name or by choosing the recipient from your Recent list. A message recipient can be an individual person, a group of people, or an on call schedule. If the recipient you are messaging does not have a personalized picture, the application distinguishes between the recipient types with the following icons:
| Individual Recipient | |
| Group | |
| On Call Schedule |
Message text or media (pictures or videos) must be included before the message can be sent.
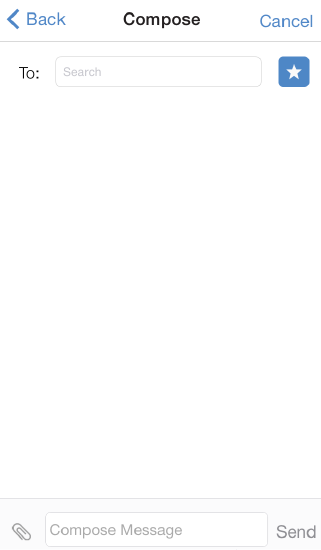
- In the Messages screen, click Compose . The Compose screen displays.
-
In the Search field, enter the name of the person you would like to send a Spok Mobile message to or choose the desired contact from the Recent contacts. The list of recent contacts can be accessed by clicking on the Recent button. If you have not authenticated, the Directory Authentication screen displays. Please note that you must authenticate your device one time before being able to access contacts for your site.
NOTE: If your site administrator makes changes to your site’s Spok Mobile configuration, you may be required to authenticate more than once.
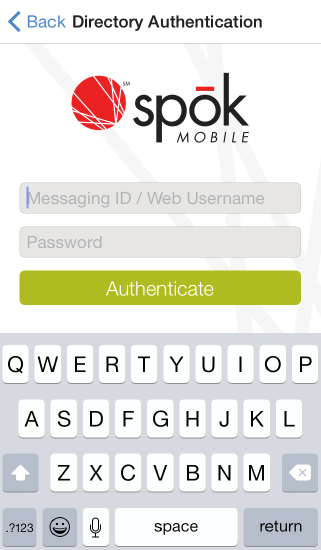
- In the Messaging ID / Web Username field, enter the username that is required to access contacts in your site’s host system. This value is configured in your site’s host system by a system administrator. For additional information on what should be entered into this field, please contact your system administrator.
- In the Password field, enter the password that is required to access contacts in your site’s host system. This value is configured in your site’s host system by a system administrator.
- Click Authenticate. Search results display. Please note that if recipients are unavailable for messaging, their names display in gray and they cannot be chosen as message recipients. Additionally, if a recipient is using a “secure” device, an icon displays next to their name. Search results display.
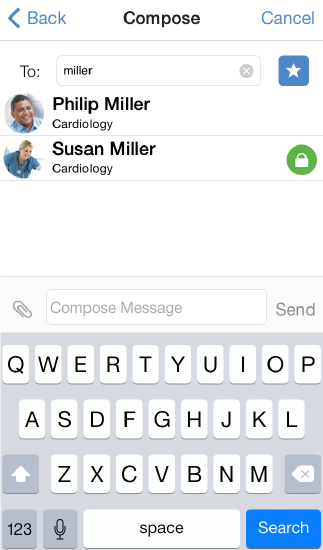
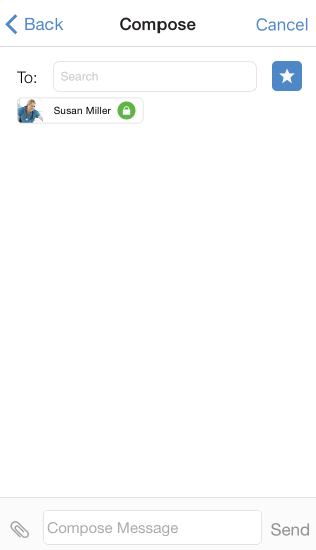
- From the list of search results, choose the person you would like to send a message to. That person’s name and profile picture display in the Compose screen. Please note that additional message recipients can be added as desired.
Attaching Existing Videos
To add an existing video to a composed Spok Mobile message, perform these steps:
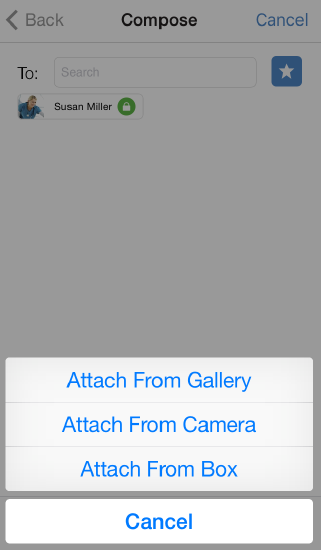
- Click Attach. A dialog displays.
-
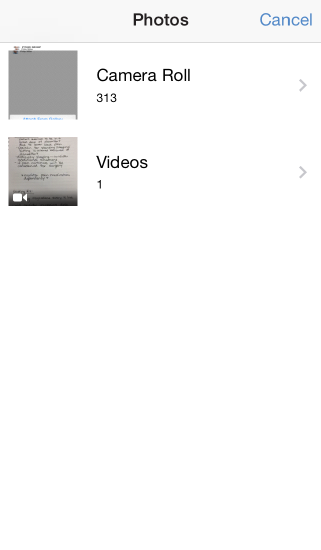
Choose the Attach From Gallery option. Your camera roll displays.
Note: You may be prompted to confirm Spok Mobile has permission to access the gallery or camera when attaching a photo or video.
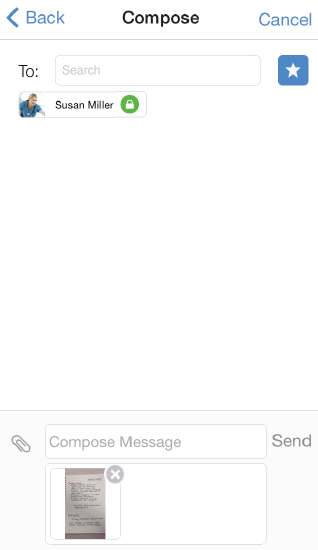
- From your camera roll, choose the previously recorded video that you would like attached to your Spok Mobile message. The video displays in the Compose screen. Please note that additional videos can be added as desired.
Attaching New Videos
To add a new video to a composed Spok Mobile message, perform these steps:
- Click Attach. A dialog displays.

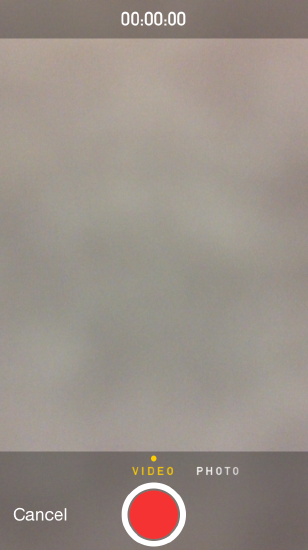
- Choose the Attach From Camera option. Your camera’s video capturing feature displays.
Note: You may be prompted to confirm Spok Mobile has permission to access the gallery or camera when attaching a photo or video.
-
Record a video that you would like to attach to the Spok Mobile message.
-
After the video is recorded, choose the Use Video option. The video is attached to your Spok Mobile message. Please note that additional videos can be added as desired.

Attaching Existing Pictures
To add an existing picture to a composed Spok Mobile message, perform these steps:
- Click Attach. A dialog displays.

- Choose the Attach From Camera option. Your camera’s video capturing feature displays.

Note: You may be prompted to confirm Spok Mobile has permission to access the gallery or camera when attaching a photo or video.
-
From the camera roll, choose the previously captured picture that you would like attached to your Spok Mobile message. The picture displays in the Compose screen. Please note that additional pictures can be added as desired.

Attaching New Pictures
To add a new picture to a composed Spok Mobile message, perform these steps:
- Click Attach. A dialog displays.

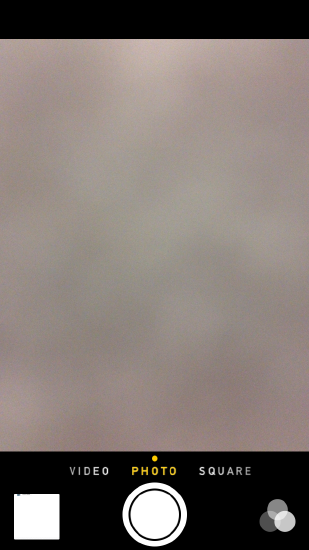
- Choose the Attach From Camera option. Your camera’s picture capturing feature displays.
Note: You may be prompted to confirm Spok Mobile has permission to access the gallery or camera when attaching a photo or video.
-
Capture a picture that you would like to attach to the Spok Mobile message.
-
After the picture is captured, choose the Use Photo option. The picture is attached to your Spok Mobile message. Please note that additional pictures can be added as desired.
